- Clothing Patterns 101
- Sleeve Styles
- Sleeve Cuffs
Sleeve Cuffs Add a Functional and Decorative Detail
Many sleeves don’t need a cuff or finish. Bell sleeves, flutter sleeves, or kimono sleeves are loose and flowy,
and these sleeves can be finished with a simple hem.
But other sleeves, after adding fullness at the bottom, must contain that fullness - whether it’s at the wrist, the bicep, or any other point along the arm.
That’s what cuffs are for. They contain the fullness that’s been added, bringing it back close to the body.
|
Cuffs can be anything from a simple band to a long, buttoned barrel cuff, as shown at left. The barrel cuff is decorative as well as functional. It completely changes the look of a Bishop's sleeve, shortening the area of fullness and ending with a snug cuff that hugs the forearm. Compare the sleeve at left with the Bishop's sleeve with narrow cuff, shown farther down the page. |

A cuff can also control the length of a sleeve, as a rolled cuff (also shown below) does. I have short arms, and if I'm too lazy to shorten the sleeves on a top, I'll just roll them up! My lazy method is also sloppy and I don't recommend it as a design detail. But I'll show you a way to make a cuff that is neat and looks deliberate, not desperate!
The barrel cuff also controls the length of the Bishop's sleeve - even with a narrow cuff, the fullness around the wrist can get in your way. The longer cuff keeps that fullness away from your wrist and hands, while allowing the soft, fluid fabric to drape nicely above the cuff.
Narrow Binding Finish
|
The most simple sleeve finish or cuff is a bound edge. It’s often used on a short puff sleeve, but it can also be used on a longer sleeve. This is used to contain the fullness of the sleeve without adding length. It also does not have an underlap or button closure. It is a continuous circle and must be large enough to allow the arm to go through the sleeve opening. It is set to the gathered bottom of the sleeve much like bias binding - it is, in fact, cut on the bias. |

Start by measuring your bicep (for the short puff sleeve) or wrist, forearm, etc - depending on the length of the sleeve.
Add ease - for a bicep, add 2” (to allow for the flexing of the muscle as you move). For the forearm or wrist, 1” ease is fine
- AS LONG AS YOU CAN STILL GET YOUR HAND THROUGH THE FINISHED CIRCLE. It helps to measure around your hand, too, to make certain that wrist + 1” will be enough.
The length you will draft for the cuff will be measurement + ease. I’ll use 12” for the bicep measurement, plus 2” ease.
12” bicep + 2” ease = 14” cuff length.

A simple band is usually 1/2 - 3/4” wide, finished. It is set to the bottom of the sleeve and folded along the bottom edge to finish - so the width of the band will be 2X the desired finished width. For a 1/2” band (finished), the width of the pattern will be 1”. REMEMBER THAT THIS PATTERN DOES NOT HAVE SEAM ALLOWANCE!! Add seam allowance on the finished pattern or when you cut the fabric.
This band should be cut on the bias!
Small Banded Cuff with closure
|
|
A simple banded sleeve cuff is probably the most commonly seen cuff. It’s used on a long shirt or blouse sleeve to contain the fullness of the sleeve (whether full, as shown at right, or fairly straight with a couple of pleats at the cuff) and to fit the sleeve to the body. It can also be used on a short sleeve, although I think many people often forget this. A short, puff sleeve can have a narrow button cuff instead of binding - it gives the sleeve a slightly more tailored look. These cuffs usually have a button closure (although a snap or other closure could be used, if preferred). A button cuff is always used with a vent - that is how the cuff opens up to accommodate the hand or arm. The sketch at left shows a vent on the long sleeve, and on the back view of the short, puff sleeve. |

To determine the size of the cuff, measure the part of the arm where the cuff will sit (bicep, elbow, forearm, wrist, etc).
Add ease - 1 1/2” at the bicep (to allow for flexing of the muscle when moving), 1” for any other point on the arm. I'm again using a 12" bicep for the short sleeve, and 1 1/2" ease for movement. The opening of the cuff allows more flexibility than the continuous ring of the binding, so we don't need 2" of ease here.

Then decide on the height of the cuff. For a short puff sleeve, you may want a smaller 1” cuff with one button (as above). The pattern is for a one-piece cuff, so draft it 2" high, with a fold along the length of the cuff.
For a long sleeve, you might want 1 1/2 - 2” high to accomodate 2 buttons (see below).
For anything higher than 2 or 2 1/2”, you’ll need to taper the cuff - we'll talk about that in the next section.
|
We will be cutting the cuff with a folded edge along the bottom (a one-piece cuff, not a 2-piece cuff), so your pattern will be 2X the desired finished width. The cuff for a long sleeve, at right, assumes a 7" wrist with 1" ease. The cuff is 1 1/2" high. Again, these numbers do not include seam allowance. |
|

Finally, add 1” for the underlap.
Because this cuff has a button closure, you’ll need extra length to allow the buttonhole (overlap) to sit over the button; for most shirt buttons a 1” over/underlap is adequate.
The cuffs shown above do NOT require any alteration to the length of the sleeve. The additional length from the cuff provides extra fullness for both style and ease of movement (especially for the long sleeves, allowing for the bend of the elbow).
The cuffs shown below WILL require some alteration to the length of the sleeve.
Barrel Cuff
|
|
A tall cuff with multiple buttons is called a Barrel cuff, and it's a very feminine finish for a full sleeve. But because the forearm is larger than the wrist, the cuff must be tapered and shaped to properly fit the arm. Because of the shaping, this is always a 2-piece cuff (the outer and inner/lining layers are cut separately for each cuff; it is impossible to have a fold at the bottom edge). |

Begin by deciding how tall you want the cuff to be (our example is 6”).
Then measure both the wrist and the forearm (as close as possible to the desired width
of the cuff). We’ll use 7” at the wrist and 8” at the forearm.
We’ll add 1” ease throughout the cuff (at the wrist and the forearm), and a 1” underlap for
the buttons.
|
Draw a rectangle the length of the cuff at the wrist and the height of the cuff (in this case, 9”X 6”). Then extend the line at the top of the cuff to Your cuff will be a trapezoid shape rather than a rectangle. |

A trapezoid is not really a good shape for a cuff. The edges won’t line up properly when overlapped and buttoned. So we need to add a bit more shape to the cuff.
|
Draw short (1/2” ) lines at each corner of the cuff, squared to the ANGLED sides. Then draw gentle curved lines from one side to the other. The curve should be about 1/4” above the original top and bottom lines in the center - it’s not a deep curve. |

This is the final shape of your cuff. It will wrap nicely around your arm, contain the fullness of the
sleeve, and the sides will match when buttoned.
|
Because the cuff will have a slightly curved shape, it cannot have a fold at the bottom edge. This is a 2 piece cuff. It will be cut with the face fabric and a lining or facing. The lining/facing will be stitched to the face fabric along the sides and the bottom of the cuff. |

ADD SEAM ALLOWANCE, either to the final pattern or when cutting the fabric.
The 1” underlap and 6” width will accomodate 4 - 5 buttons, depending on the size of the buttons.
To prevent having too much drape in the Bishop's sleeve (or whatever style of sleeve you choose for this cuff), SHORTEN THE SLEEVE by almost the same height as the cuff. For a 6" cuff, for example, shorten your sleeve by at least 5" (allowing and additional 1" of drape at the top of the cuff) or 5 1/2" for a little less drape.
Folded Cuff
|
The folded cuff, like the one at right, is really just a decorative treatment. This is a neat, intentional cuff, not simply a sloppy way to shorten a sleeve that's too long. This cuff offers a styling detail on an otherwise simple, straight sleeve. There’s a bit more to creating a cuff than just cutting the sleeve longer to allow fabric to fold. Because even a straight sleeve isn’t really straight (it’s somewhat tapered), the pattern has a bit of shape in the cuff area to ensure that it folds properly. |

We're adding a cuff to a short sleeve, but the process would be the same for a sleeve of any length (3/4 sleeve, long sleeve, etc).
|
First, determine how deep you want the finished cuff. We’re using 1 1/2” Then, trace the sleeve block, and draw a line where you want the FINISHED length to be (we’ve chosen midway between the elbow and bicep, for a short sleeve). DO NOT CUT OUT the sleeve - leave plenty of paper below the hemline. Draw 3 parallel lines below the finished hemline, each one 1 1/2” apart (or whatever you’ve decided for the depth of the cuff). Cut AROUND the drawing - do NOT cut along any of the dotted lines or the sides of the pattern yet. Cut about 1" away from the side lines. |

Fold the paper toward the BACK of the pattern, folding along line #1. (see sketch at left, below)
Then fold again, toward the FRONT of the pattern, along line #2. (see sketch at right, below)
NOW, you can cut out the pattern along the drawn lines (keep the folds in place as you cut).


|
When you unfold the paper, the pattern will look much like the one at left. The lower portion has a zig-zag effect along the sides. Cutting and stitching the sleeve following this shape at the bottom will allow you to re-create the cuff in fabric. To sew the sleeve, stitch the underarm (side seams of the sleeve, following the zig-zag shape). Then fold along line #1 and stitch the hem (which will be 3” deep). Fold one last time (along line #2, or folding the hem in half) to create the cuff. The cuff can be tacked in place along the underarm seam, if desired. |

I realize that the instructions for the folded cuff are a bit confusing, so below is a video demonstrating the process. I apologize that the pattern is mostly out of camera range towards the end, but I think the information before that may be useful.
Explore More Sleeve Styles


Return to Clothing Patterns 101 Home Page
ClothingPatterns101.com does not sell the personal information of its users to anyone, ever.
What's New - The Latest News in Sewing and Recent Articles on ClothingPatterns101
-
Designing Sleeve Cuffs
 Sleeve cuffs are the finishing touch for your sleeves. Long or short, most sleeves benefit from a cuff that contains the fullness, and adds styling detail, too!
 -
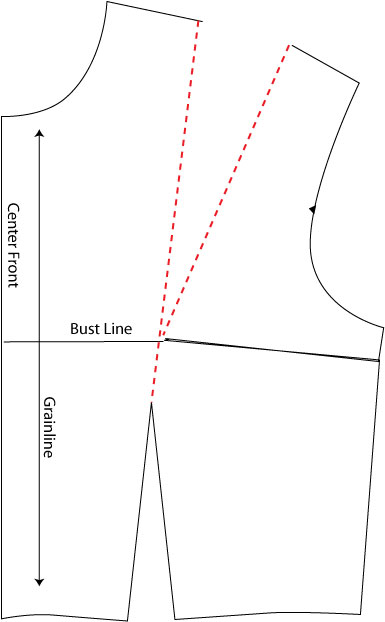
Drafting Center Front Darts or Tucks
 Moving your bodice darts to the center front creates a subtle emphasis on the bust, while maintaining the fit of your original bodice pattern.
 -
How to Draft a Sheath Dress Pattern
A sheath dress is, essentially, your block dress pattern - but without the waist seam. A sheath is a close-fitting dress, and so simple to draft - there's little difference from your block!
Tips and Techniques!
Watch videos that demonstrate the techniques you will use to design your patterns. And get tips to make the process easier!
Videos are added periodically, so keep checking back!
- More on Pattern Manipulations to Move Darts and Add Fullness
- More on Using Quarter Scale Patterns
- Style vs Fashion - Do You Know the Difference?
- Patternmaking Tools to Get You Started
- How Collars Work
- Sewing Gifts for Your Friends - or for You!
- The Difference Between Sewing Ease and Style or Fit Ease
- Do You Speak the "Language of Patterns"?
- Even the Greatest Style Falls Flat if it's Out of Proportion
- Where Do You Find Design Inspiration?
- Do You Have Trouble Fitting The Bust?
- What are Style Lines?
- Flat Pattern vs. draping
- The Difference Between Fit Ease and Style Ease
- Don't Make MY Mistakes! Do a Proper Muslin Fitting
- What Does It Mean to "True Your Pattern?"
- Using Basic Pattern Techniques
- Customize your Body Form
- Slashing and Spreading your Pattern to add Fullness
- Turning your Darts into Styling Details
- Using your Quarter Scale Patterns
- Why Do I Need Darts? They're so UGLY!
- Why Do I Need a Dress Block? Can't I just re-design a purchased pattern?