- Clothing Patterns 101
- Basic Pattern Techniques
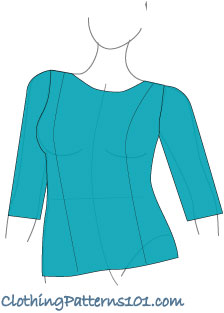
- Center Front Darts or Tucks
Drafting Center Front Darts or Tucks
Manipulating your bodice darts to the center front creates a look that subtly emphasizes the bust, while maintaining the fit of the original bodice pattern.
|
The technique is really quite simple, but it can result in a number of different aesthetic choices. I've shown a dress in a striped fabric - notice how the direction of the stripes changes from the shoulder area to the waist. The darts not only draw in the excess fabric that shapes around the bust, they also change the grainline between the upper and lower areas of the bodice - which would not be noticeable in a solid color, but is highlighted with stripes. In this case, the stripes, and their changing direction, become part of the aesthetic design of the dress! (I'll demonstrate that a bit more, later). |

Manipulating Bodice Darts to the Center Front
|
To begin, slash your traced pattern from the shoulder to the tip of the waist dart, and close the side bust dart.
|

|
Draw 3 lines from the center front to the existing darts. You can do more than 3 lines, or fewer - it’s up to you and how you want your bodice to look. But 3 is a good place to start. |

|
Then, close both the shoulder dart and the waist dart, opening the darts at the center front.
|

|
Your final pattern will look something like this.
|

To demonstrate, I'll show you 2 versions of the bodice, using each grainline.
First, I've made a single pattern piece for each version - you do not need a center front seam throughout the bodice, unless you choose to use one. You can make a one-piece bodice, with a split to accommodate the darts.
I've also made the neckline a "V-neck", per the original sketch. The center front darts do NOT cause the neckline to pull down into a V shape, although it can look that way. This is simply a design choice, but I think it works well with the front darts.
In the first option, below, I've joined the pattern below the darts, maintaining the straight of grain in the waist area. The split for the darts is at the upper bodice, above the darts.
This results in horizontal stripes in the waist area, below the darts. The grainline and stripes above the darts are distorted, creating stripes that are at an angle that somewhat mimics the neckline.


In the second option, I have joined the bodice into one pattern above the darts, keeping the split below the darts. I've maintained the straight of grain above the darts, in the shoulder area.
This results in horizontal stripes across the upper bust and shoulders, while the grainline below the bust is distorted due to the split. The stripes below the bust are then diagonal, meeting in a chevron pattern at the center seam below the bust.


This video demonstrates the drafting technique:
In either case, the stripes around the bust itself slowly change from horizontal to diagonal, and the effect can be a subtle, lady-like emphasis on the curves of the bust.
There is no right or wrong here - these are simply design choices.
This dart technique offers the opportunity to experiment with fabrics and patterns and make the fabric selection a key component of your design. Use plaids or checks as well as stripes, and see which grainline direction gives you the most interesting effect.
Or, stitch tucks instead of darts (using the marks for the "legs" of the darts to create the tucks). In a soft, more fluid fabric, the tucks can still be the star of the bodice, but the result will be softer and less structured.
There are so many options!
Other Examples for Using Basic Pattern Techniques


Return to Clothing Patterns 101 Home Page
ClothingPatterns101.com does not sell the personal information of its users to anyone, ever.
What's New - The Latest News in Sewing and Recent Articles on ClothingPatterns101
-
Add Flare to Your Gored Skirt with a Trumpet
 A trumpet skirt is a gored skirt with flare added at the hem only. The result is a skirt that fits closely through the hip, then flares out like a trumpet!
 -
Waist treatments finish your pant or skirt with style
Waist treatments finish your skirt or pants with style. Opt for a simple waistband, or something more decorative! -
Add a Waistband to Finish Your Skirt or Pant
A waistband is the most common finishing touch for a skirt or pant. It allows the garment to "hang" freely from the waist while allowing ample room for movement.

Tips and Techniques!
Watch videos that demonstrate the techniques you will use to design your patterns. And get tips to make the process easier!
Videos are added periodically, so keep checking back!
- More on Pattern Manipulations to Move Darts and Add Fullness
- More on Using Quarter Scale Patterns
- Style vs Fashion - Do You Know the Difference?
- Patternmaking Tools to Get You Started
- How Collars Work
- Sewing Gifts for Your Friends - or for You!
- The Difference Between Sewing Ease and Style or Fit Ease
- Do You Speak the "Language of Patterns"?
- Even the Greatest Style Falls Flat if it's Out of Proportion
- Where Do You Find Design Inspiration?
- Do You Have Trouble Fitting The Bust?
- What are Style Lines?
- Flat Pattern vs. draping
- The Difference Between Fit Ease and Style Ease
- Don't Make MY Mistakes! Do a Proper Muslin Fitting
- What Does It Mean to "True Your Pattern?"
- Using Basic Pattern Techniques
- Customize your Body Form
- Slashing and Spreading your Pattern to add Fullness
- Turning your Darts into Styling Details
- Using your Quarter Scale Patterns
- Why Do I Need Darts? They're so UGLY!
- Why Do I Need a Dress Block? Can't I just re-design a purchased pattern?