- Clothing Patterns 101
- Pant and Shorts Styles
- Sailor Pant
How to Draft a Sailor Pant Pattern
The Sailor-styled pant is a classic! It gets revived from time to time as a fashion statement, but I think it looks great any time.
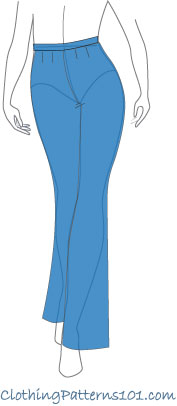
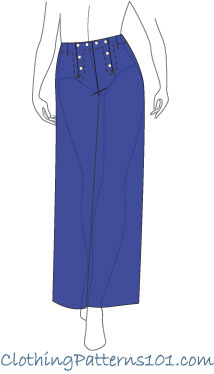
The pant flares gently from the hip, and an authentic sailor pant pattern includes the button-front opening (which involves a flap that folds down to pull the pant on).
|
This pant fits the body well through the waist and hip, with a gentle flair from the hip to the hem. The leg draft is the same as the pant flared from the hip - the rest is all about that button flap! This version of the pant also includes a waist facing rather than a waistband. As a fashion style, I've seen it with a waistband and cuffs, but the more authentic sailor pant pattern does not have those features. Neither does it flare from the knee, although that was commonplace in the 1960's and '70's. Let's not make this any more complicated than necessary! |
 |
Drafting the Sailor Pant
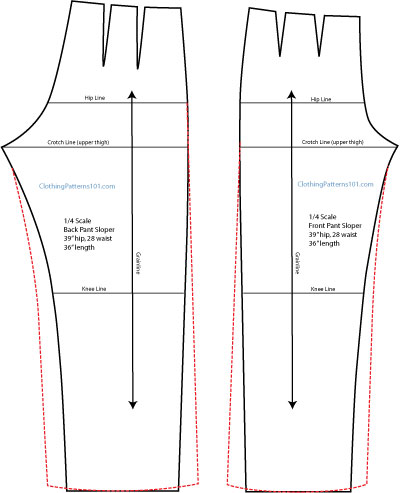 |
Like the basic pant flared from the hip, you'll start (with a copy of your pant block) by drawing a line from the outseam hip line to the hem, adding about 1" at the hem. On the curved inseam, draw a line from the crotch point to the hem, adding another 1" at the hem. This line will still have a bit of curve near the crotch point, but it will be straighter than the original line. Do the same on both the front and the back pant leg patterns, and you'll be adding 4" in width at the hem of each leg. And that completes the leg of the sailor pant pattern! |
Drafting the Front Button Flap
The rest of the instructions pertain to the button flap, and therefore only uses the front pant pattern pieces. I'll illustrate only from the waist to hip, to make the instructions more clear.
|
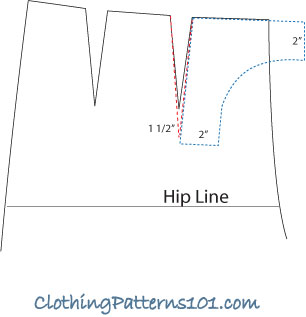
Start by elongating the 1st dart by 1 1/2” (if there is only one dart, elongate that). This becomes the front opening and needs to be longer so you’ll be able to get into the pant. Follow the red dashed lines in the sketch at right. Next, draft the underlap/overlap that will actually close the front pant. Follow the blue dashed line for this: |
 |
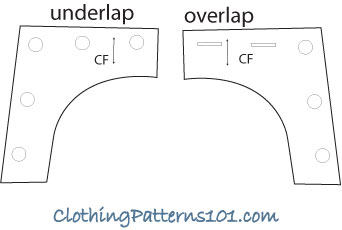 |
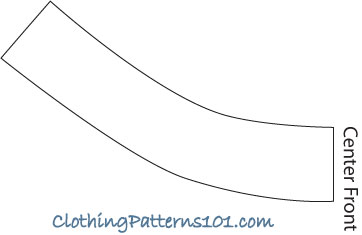
You’ll end up with a pattern piece like the one at left. You’ll use this piece for both the underlap and overlap, and their corresponding facings (so when you cut the fabric, you’ll cut 4 pieces for each lap). The sketch shows both the underlap and overlap pattern pieces, with button/buttonhole markings as needed. The underlap/overlap is where you’ll put the buttons, with 2 buttonholes in the overlap to close the pant at the waist. (Note the small CF arrows on each side - that is where these 2 pieces will overlap). |
|
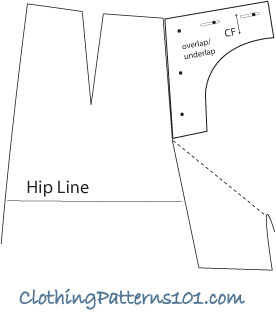
To understand how this over/underlap works, set this underlap/overlap piece to the front of the pant piece, as shown at right (in the sketch, the center front part of the pattern is folded down to show the underlap, and this pant has the 2nd dart that is not being used at this point). Set the underlap piece to the outer leg of the longer dart. When the front section (which is shown folded down) is put back in place, buttoning the finished pant will "close" the dart. The video below, showing how to stitch the front facing, makes it all much more clear! |
 |
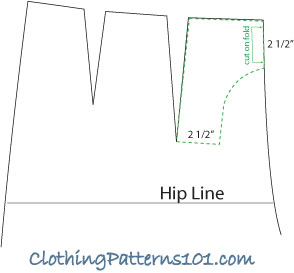 |
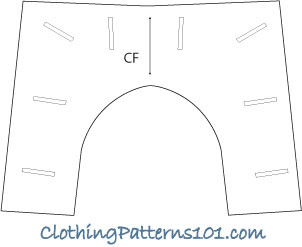
This sketch, while it looks much like the over/underlaps, is for the facing you'll use to finish the center front flap itself (NOT the over/underlaps). Draw a shape very similar to the underlap, but without the front extension. In fact, the center front will be cut on the fold for a one-piece facing. (follow the green lines on the sketch) |
|
Your final pattern piece for the front flap facing should look like the sketch at right. The front flap is where you’ll place the buttonholes (as marked in the sketch), so the facing exists both to finish the edges of the flap, and to reinforce the buttonholes. |
 |
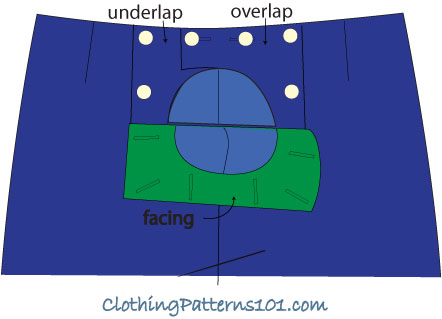 |
When the pant is stitched, the underlap/overlap, flap and facing configuration should look like the sketch at right. The white "dots" are the buttons, sewn to the under/overlaps. The overlap at the right has 2 buttonholes instead of buttons at center front (This holds these pieces closed - see the markings on the pattern pieces sketch, above). |
The center front of the pant (outer flap) is shown folded down to open the pant. The flap facing is green (just to make it stand out from the other pieces - you obviously don't need to do this!).
The lighter blue areas are the "wrong side" of the blue fabric (ie, you're seeing the inside of the back pant and the wrong side of the flap).
When the flap is pulled up, it buttons to the underlap/overlap buttons at the sides and across the top of the pant. This completely closes the pant, closes the 1st waist "dart", and completes the sailor look!
More Pant Styles
|
More Waist Treatments
Return to Clothing Patterns 101 Home Page
ClothingPatterns101.com does not sell the personal information of its users to anyone, ever.
